Many individuals prefer to do security system installation themselves than to hire a professional. There are some basic steps DIYers should take to prepare for the task. Due to rising crime rates, security is no longer a luxury and installing a system yourself can keep the cost down.
Many homes have alarm systems and security cameras with motion sensors to put off burglars. How complex the system is, depends on the family’s need. There is a growing number of homeowners who are choosing to invest in a quality alarm system or security cameras to aid in protecting their families and valuable. Many insurance companies offer discounts for homeowners having alarm systems.
Before making a selection or buying a home alarm system or security cameras with motion sensors, it is prudent to determine the tasks to be performed. A basic system warns the family if an intruder attempts to break into a home.
More advanced systems can detect smoke, fire, and water levels as well as monitor temperature change. The size of the alarm system needed and the doors and windows to be included in a system have an impact on how complicated the installation will be.
Additional add-ons also play a part in the level of difficulty for the installation. Unless you purchase an alarm system from a company that provides installation, it is likely the alarm system will be obtained from other sources.
Many security systems come with a complete kit. They contain everything needed to get the system up and running. DIYers need to take these tips into considerations to ensure proper installation.
Alarm Systems

- Determine each entry point and the number of sensors required. Doors are not the only points of entry.
- When mounting the sounding mechanisms, be sure the sounder is away from moisture and heat if placed outdoors. Enclose it in a protective box.
- Sensors are to be mounted within edges of windows and doors.
- Make sure there is a good reception with the magnet.
- Select a central position for the control panel. All components should be integrated into a mounted control panel.
- Test the system by opening entry points to see if the sensors work correctly and the sounders are clearly heard.
Security Cameras

Each camera typically includes 60 feet of cable, a mounting kit with anchors and screws, and a power adaptor or receiver. Ordinary household tools like screwdrivers, drills, and hammers are needed for security camera installation and making final positioning and adjustments.
Where to Install Security Cameras
Weatherproof security cameras can be installed wherever they are most needed. It is not economically feasible to put cameras everywhere. Focus on viewing specific areas that are the cause of the most concern.
Optimize installation locations with these tips.
- Place the cameras high, at least ten feet above the ground. The placement provides a broader area of coverage and protects the camera from vandalism.
- Keep it under shelter. By doing so, the impact precipitation has on security footage quality is reduced.
- Point the camera away from light. Mount the camera so that the lens is not pointed at a light source.
- Make the field of view obstruction-free. Obstructions should not be the point of focus.
- Protect the camera cables. Install the camera on the ceiling, soffit, or side of the building to conceal the wires.
- Make the placement of the camera visible. The appearance of a security camera can deter potential intruders.
Installation Process
No security installation is the same. The connections used, follow somewhat of a pattern that makes the installation process more manageable. Security camera connection is usually made in one of three ways.
Analog Wiring
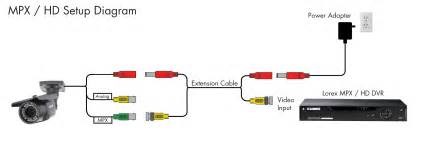
Analog security system wiring uses BNC cable to connect a DVR, camera and power source.
All-in-one cable provides power and video transmission. The video head of the cable plugs into the DVR. The power head connects to an adaptor that is included.
PoE Wiring

NVR systems utilize power-over-ethernet technology. A single ethernet cable connects the recorder and camera.
The cable clicks into the backs of the IP camera and NVR. The cable provides both power and video transmission.
Wireless Connection
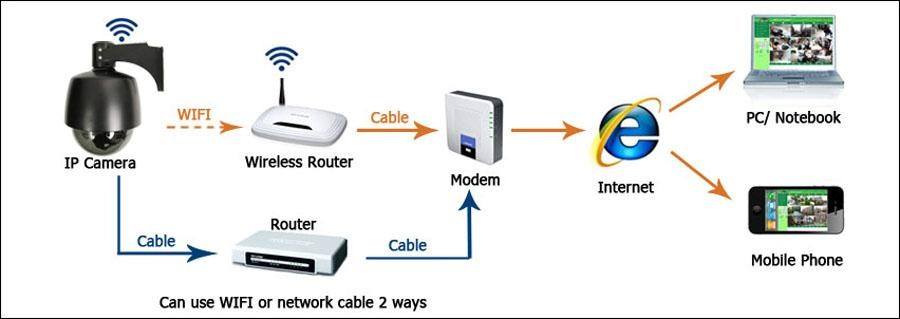
You do not have to run video cables underground or through buildings with wireless security system connections.
Camera locations can easily be changed. A small wired transmitter is attached to the DVR that wirelessly connects to the camera.
Security cameras are designed to be do-it-yourself friendly. They come with detailed instructions and the parts needed for installation are included. Cameras can be mounted to the ceiling. Holes are drilled to attach the stand mount.
A 3D flex mount allows the same camera to be mounted to the wall by twisting the stand and applying it to the wall. It also allows the camera to be mounted on a counter setting. The edge of a fence or ledge is an example of using the counter mount outdoors.
When cameras are installed outdoors, it is often necessary to extend the range from the camera to the DVR. The distance between the recorder and camera can usually be increased. Each security camera type is done differently.
Analog cameras can be 800 feet away from the DVR. A PoE switch is needed to extend IP, HD, or PoE security cameras. Wireless range extenders are used to extend wireless camera distances.
Mounting the Camera
- Take the camera mounting pedestal and place it against the installation surface
- Using a marker, trace the mounting hole locations
- A 5/16” masonry drill is used to drill holes one inch deep
- Insert the plugs into the holes and tap with a hammer until fully inserted
- Line up the camera pedestal with the plugs
- Insert the mount screws and tighten with a Phillips screwdriver
- Attach the camera mount to the camera
- Mount the camera on the pedestal
- Point the camera in the direction of the area to be observed and tighten it to the mount
- Remove the protective film covering the lens of the camera
The process is repeated for any other cameras. Security camera instructions will probably include a website or technical support telephone number. Using those resources if the directions are unclear is a valuable tip.